
How To Replace Shower Taps Can Refresh The Look Of Your Bathroom And Help Solve Common Problems Like Drips, Stiff Handles, Or Poor Temperature Control. In Many Cases, The Repair Involves Replacing The Trim, Handles, Or Cartridge Rather Than Removing The Entire Valve Body Inside The Wall. That Makes The Job Much Simpler For A Standard Bathroom Upgrade.
Turn Off The Water First
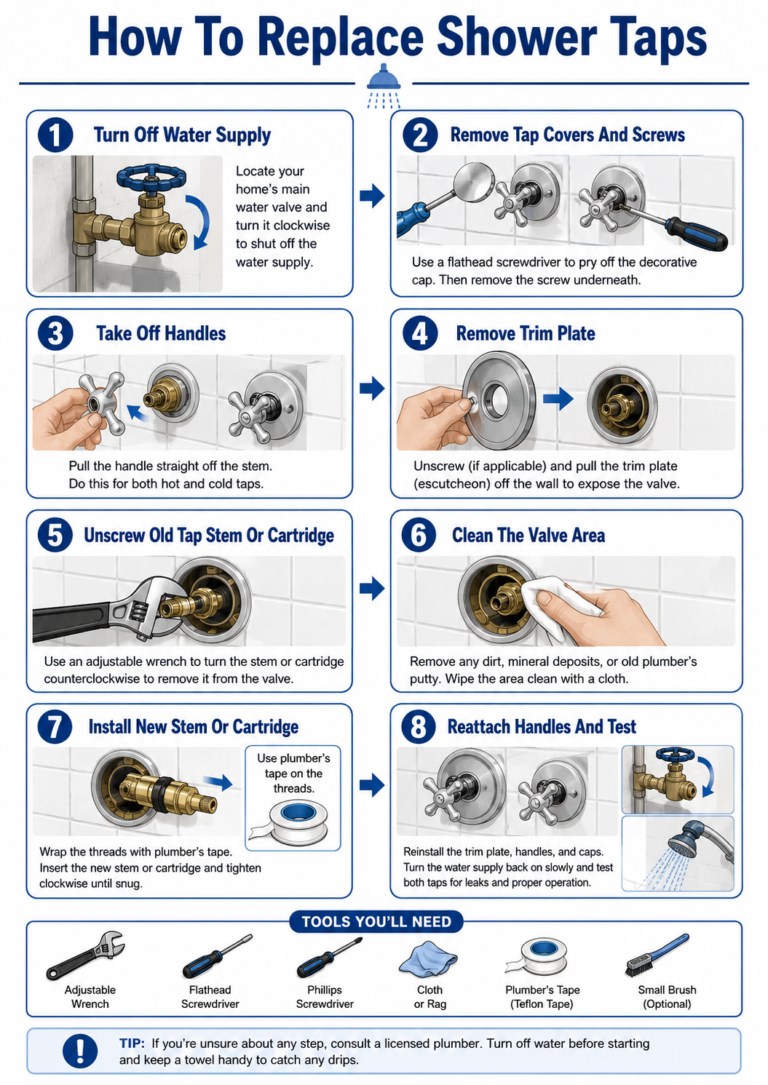
Before You Start, Shut Off The Water Supply. If Your Shower Does Not Have Local Shutoff Stops, You May Need To Turn Off Water To The Whole House. Then Open A Faucet At A Lower Level To Release Pressure In The Lines. This Step Helps Prevent Sudden Water Flow When You Remove The Old Shower Taps Or Trim Parts.
Remove The Old Handles And Trim
After The Water Is Off, Remove The Existing Handle, Faceplate, And Decorative Trim. Most Shower Faucet Systems Use Screws Hidden Under A Cap Or Behind The Handle. Work Carefully So You Do Not Damage The Finish Or Scratch The Wall Surface. If Old Caulk Or Sealant Holds The Trim In Place, Cut It Gently Before Pulling The Parts Away.
Replace The Cartridge Or Internal Parts
Many Leaking Or Hard-To-Turn Shower Taps Need A New Cartridge Instead Of A Full Valve Replacement. The Cartridge Controls Water Flow And Temperature, So A Worn Unit Can Cause Drips, Uneven Mixing, Or Poor Control. Once You Remove The Handle And Trim, Take Out The Retaining Clip Or Nut, Pull The Old Cartridge, Clean Or Flush The Valve Body If Needed, And Install The Correct Replacement Part For Your Faucet Model.
Install The New Shower Tap Trim
After You Fit The New Cartridge Or Replacement Parts, Install The New Escutcheon Plate, Handle, And Any Matching Trim Pieces. Follow The Manufacturer’s Orientation Marks So Hot And Cold Settings Work Correctly. Tighten The Parts Securely, But Do Not Overtighten. A Proper Fit Helps The Shower Taps Operate Smoothly And Keeps The Bathroom Looking Clean And Finished.
When You Need To Replace The Whole Valve
If The Valve Body Is Damaged, Corroded, Or Incompatible With The New Trim, You May Need To Replace The Entire Shower Faucet Valve. This Job Is More Complex Because It Usually Requires Opening The Wall, Disconnecting Plumbing, Installing The New Valve, Securing It In Position, And Testing For Leaks Before Closing The Wall. General Installation Guides Also Recommend Following The Product Instructions And Local Plumbing Codes For This Type Of Work.
Test For Leaks And Check Operation
Once Everything Is Back In Place, Turn The Water Supply On Slowly And Test The Shower. Check Around The Handle, Trim Plate, And Valve Area For Leaks. Then Run Hot And Cold Water To Make Sure The Flow, Temperature Control, And Shutoff Function Work Properly. A Final Leak Check Helps Confirm That Your Shower Taps Are Installed Correctly And Ready For Daily Use.
Final Thoughts
Learning How To Replace Shower Taps Can Help You Fix Minor Bathroom Problems Without A Full Remodel. If The Job Only Requires New Handles, Trim, Or A Cartridge, It Is Often A Manageable DIY Project. If The Valve Inside The Wall Needs Replacement, The Work Becomes More Technical, So Careful Planning Matters. With The Right Parts And Proper Installation Steps, New Shower Taps Can Improve Both Bathroom Style And Everyday Performance.
 B2B Inquiry CTA
 For export quotations, bulk orders, or project cooperation, Get in Touch with our sales team.
Email: info@landonbath.com
WhatsApp: +86-13750308364