How To Replace A Faucet Bathroom: A Complete Step-By-Step Guide
Replacing A Faucet Bathroom Is One Of The Most Practical Home Improvement Projects For Homeowners. Whether Your Old Faucet Is Leaking, Outdated, Corroded, Or No Longer Matches Your Bathroom Style, installing a new fixture can quickly improve both appearance and functionality.
Learning How To Replace A Faucet Bathroom helps save money on plumbing costs and gives you more control over bathroom upgrades. In most cases, the job can be completed with basic tools, careful preparation, and the right replacement faucet.
Why You May Need To Replace A Bathroom Faucet
There are several common reasons to replace an old bathroom sink faucet. Some homeowners want a more modern design, while others need to solve plumbing or performance issues.
Common reasons include:
-
Water Leaks
-
Corrosion Or Rust
-
Low Water Flow
-
Damaged Handles
-
Outdated Bathroom Design
-
Worn Internal Parts
-
Faucet Upgrade During Bathroom Renovation
A new Faucet Bathroom can improve water efficiency, refresh the vanity area, and add value to the bathroom.
Tools And Materials You May Need
Before Starting, prepare the tools and parts needed for the replacement.
Common tools and supplies include:
-
Adjustable Wrench
-
Basin Wrench
-
Channel-Lock Pliers
-
Screwdriver
-
Bucket
-
Towel Or Rag
-
Plumber’s Tape
-
Putty Knife
-
Silicone Sealant Or Plumber’s Putty
-
New Bathroom Faucet
-
New Supply Lines If Needed
Having everything ready before starting makes the installation smoother and faster.
Turn Off The Water Supply
Before removing the old faucet, always shut off the hot and cold water supply valves under the sink. Turn both valves clockwise until they stop.
After shutting off the water, turn on the faucet to release any remaining pressure and drain excess water from the lines. Place a bucket or towel under the sink to catch any leftover water when disconnecting supply tubes.
This step is important for avoiding spills and making the faucet replacement safer.
Disconnect The Water Supply Lines
Use an adjustable wrench to disconnect the hot and cold water supply lines from the faucet connections under the sink. If the supply lines are old, corroded, or worn, this is a good time to replace them with new ones.
Once disconnected, check for any signs of leakage, mineral buildup, or damaged fittings that may affect the new faucet installation.
Remove The Old Bathroom Faucet
The old faucet is usually secured with mounting nuts located underneath the sink. Use a basin wrench or adjustable wrench to loosen and remove these nuts.
After the mounting hardware is removed, lift the old faucet out from the top of the sink. If the faucet is stuck because of old sealant or mineral buildup, gently loosen it with a putty knife.
Once the old fixture is removed, clean the sink surface thoroughly. Remove old putty, silicone, dirt, and mineral residue so the new faucet can sit flat and seal properly.
Check The Sink Hole Configuration
Before installing the new faucet, confirm that the sink hole configuration matches the faucet design.
Bathroom sinks usually have:
-
One Hole
-
Three Holes
-
Centerset Faucet Layout
-
Widespread Faucet Layout
-
Single Handle Faucet Opening
Make sure the new Bathroom Sink Faucet is compatible with the number and spacing of sink holes.
Install The New Bathroom Faucet
Follow the manufacturer’s instructions for the new faucet, since mounting styles can vary slightly.
In most cases, the process includes placing the faucet through the sink holes and securing it underneath with mounting nuts or brackets. If required, apply plumber’s putty or silicone sealant around the faucet base before installation.
Position the new faucet carefully so it is centered and aligned properly. Tighten the mounting hardware evenly to keep the faucet stable without overtightening.
Connect The Water Supply Lines
Reconnect the hot and cold water supply lines to the new faucet. Use plumber’s tape if recommended for threaded connections, but avoid overtightening.
Make sure:
-
Hot Water Connects To The Hot Side
-
Cold Water Connects To The Cold Side
-
Connections Are Secure
-
Supply Lines Are Not Twisted Or Kinked
If the new faucet includes its own pre-attached hoses, connect those directly to the shut-off valves.
Install The Drain Assembly If Included
Many bathroom faucet replacement kits also include a new drain assembly or pop-up drain. If you are replacing the drain as well, remove the old drain components and install the new drain according to the manufacturer’s instructions.
This usually involves:
-
Removing The Old Lift Rod
-
Taking Out The Old Drain Flange
-
Applying Plumber’s Putty Or Sealant
-
Installing The New Pop-Up Drain
-
Connecting The Pivot Rod And Lift Mechanism
A matching drain assembly helps complete the faucet upgrade and improves both appearance and performance.
Turn The Water Back On And Test The Faucet
Once all connections are complete, slowly turn the hot and cold shut-off valves back on. Check underneath the sink for leaks around the supply lines, drain fittings, and faucet mounting area.
Then test the new faucet by turning on both hot and cold water. Let the water run for a few moments to flush out air and debris from the lines.
Make sure to check:
-
Water Flow
-
Handle Operation
-
Drain Performance
-
Leaks Under The Sink
-
Leaks Around The Faucet Base
If any connection drips, tighten it slightly and test again.
Common Mistakes To Avoid
When replacing a bathroom faucet, a few common mistakes can create installation problems.
Avoid these issues:
-
Forgetting To Shut Off The Water
-
Buying The Wrong Faucet Size
-
Overtightening Connections
-
Skipping Sink Surface Cleaning
-
Reusing Damaged Supply Lines
-
Misaligning The Faucet
-
Ignoring Small Leaks After Installation
Careful preparation and correct installation help prevent future plumbing problems.
Tips For Choosing A New Bathroom Faucet
When selecting a new Bathroom Faucet, consider both style and performance.
Important factors include:
-
Faucet Hole Compatibility
-
Single Handle Or Double Handle Design
-
Finish Color
-
Water Efficiency
-
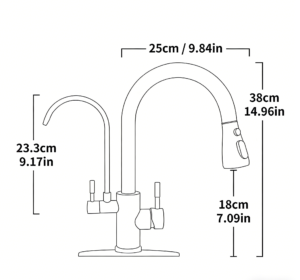
Faucet Height And Reach
-
Drain Assembly Type
-
Bathroom Vanity Style
-
Material Quality
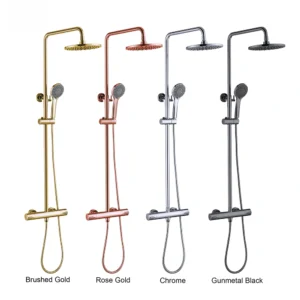
Popular finish options include chrome, brushed nickel, matte black, brushed gold, and stainless steel. Choosing the right faucet can improve both daily use and bathroom aesthetics.
Conclusion
Learning How To Replace A Bathroom Faucet is a valuable skill for homeowners who want to upgrade bathroom fixtures, fix old faucet problems, or improve sink performance without hiring a plumber. By turning off the water supply, removing the old fixture, preparing the sink surface, and installing the new faucet carefully, you can complete the project with basic tools and good preparation.
Whether you are installing a Single Handle Bathroom Faucet, Widespread Bathroom Faucet, Centerset Faucet, Or Modern Vanity Faucet, a successful replacement can refresh your bathroom and improve long-term usability. With the right faucet and a careful installation process, replacing a bathroom faucet can be a simple and rewarding upgrade.